Remember what I said about creating the first plain text image in "Fire Text"? Do it again! ;)
 Here's our starting out image. Nothing fancy at all. Use the Magic Wand to select the black area. Make SURE your Image > Mode is set to Grayscale.
 Choose Filter > Pixelate > Crystallize. Set it to 10. The image should now look this.
 Next invert the selection. You can do this with CTRL + SHIFT + I. (*Tip* Use the Magic Wand and hold down the ALT key, then select on areas like the black center of an "O." That'll deselect it so it doesn't have noise added) After that do Filter > Noise > Add Noise; set it to 60 and Gaussian. Then do Filter > Blur > Gaussian Blur; set it to 2.0. The image should now look like this.
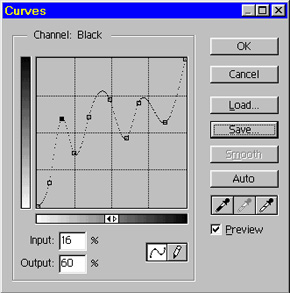 Nooow the tricky part. Goto Image > Adjust > Curves. Try tweaking it around.. The finished thing should look like the image just below this (sans the icicles). To the left is an example of the one I used for the pic.
 Next Rotate the pic 90 CCW and Filter > Stylize > Wind; wind from left. Rotate 90 CW. Looking spiffier huh?
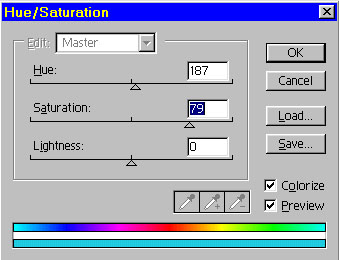 Next we convert the image to RGB color (Image > Mode > RGB). And do Image > Adjust > Hue/Saturation. At left are the things I selected for ice tones. Feel free to play around with them!
 And here's the finished image, touched up a bit with some sparkly brushes that come free with Photoshop. ;) ((Photoshop directory)/Goodies/Brushes/Misc)